![]()
![]()
Winter preparation is a bit overwhelming and stressful for the beginner and this course will help newer beekeepers with lessons learned, how to's and even what not to do's. In this 101 course the article and video below show how we prepare for winter here in Southwest Missouri.
One of the hot topics at this time of year is how to prepare the colonies/hives for the winter. Like most of beekeeping, there are several ways to successfully do this. What I would like to do is describe what works for me. Hopefully, this will give you some ideas to ponder.
Just an aside, we often use the term “hive” to describe the whole ensemble - bees and equipment. To be more correct, “hive” refers to the equipment; The boxes, lids, bottoms, frames, etc. A colony of bees live in a hive. So much of the time when we say “hive”, what we actually mean is “colony”.
 I start “prepping” for winter in September by doing an inspection and determining which colonies have thrived that year and which ones haven't. The ones that haven't thrived are usually not fed. There is not much point in feeding hives that don't do well on their own. Giving them feed will not change the root problem that has caused them to perform poorly. And, again, I don't want to promote these poor genetics in my operation. I don't want to promote bees that need constant feeding and treatments to stay alive.
Poorly performing colonies are marked to be culled out. I don't cull them at this time, I just mark them. In mid-late October, I will disassemble them. Their frames are distributed to other hives that are doing well but could use a little boosting. Sometimes I will feed these hives so they will better stock the frames that I will re-distribute. I am not feeding them to boost them up, I am feeding them to boost the frames that I will give to other colonies.
Now, I don't want to sound too hard-hearted, so I will say there are sometimes extenuating circumstances....Some of the smallest colonies are small because they were started late in the year, say after June 15th. Some of my small colonies are late removals I've done in June, July, August or later. These colonies could not reasonably be expected to grow to full strength when they were started after the main nectar flows were over. So they get special consideration. They may get fed and stacked on a strong hive for the winter.
In September, I will add a winter rim to the hives. A winter rim is essentially a 2 inch tall box/honey super. By adding it in September, it gives them time to propolize it well and seal the drafty spots. Most colonies will not build comb in this 2” empty space in the fall (although a few have surprised me!). However, it is important to get this rim off by April or it really does become a 2 inch honey super that is filled with free range combs, honey, and brood!
This rim also has 2 holes for ventilation. The holes are 3/8” to 1/2” in diameter. I will come back to why I use ventilation in a bit. If robbing is a problem that year, I may put a piece of tape across the holes until December to keep the robbers out.
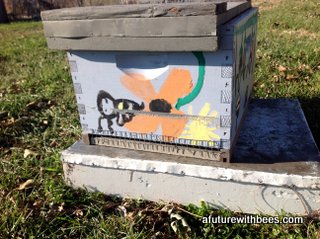
In October I start serious winter prep. I make sure every hive has a mouse guard on it! I hate opening hives in the spring to find combs and frames destroyed by mice building nests. As most of you know, I keep 1/2” hardware screen stapled across the entrance of my hives year round as mouse guards. So I never have to wonder whether a mouse has gotten into my hives. The 1/2” screen doesn't hinder the bees even the slightest bit.
Next, if the hive has a screened bottom board, I close it off. The way my hives are constructed, I simply tilt the hive forward and slide a piece of corrugated plastic sign board under the hive. This closes off the screen from drafts but allows the screen to continue to do its job.
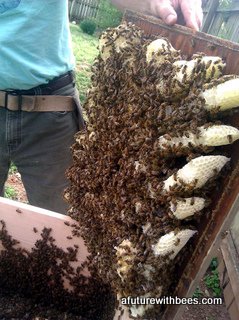
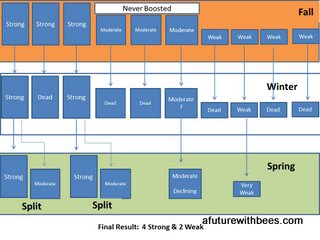 Then I break apart the weak colonies and distribute those frames to the strong colonies that need an extra frame or two. Notice that I am not “combining”. All the frames from a weak colony do not have to go to the same place. I can put two frames in one colony, and three frames in a different colony based upon their needs. Each strong hive gets only the amount of frames they need to achieve winter strength. I am not saving the queens from these weak colonies. I have found that combining two weak colonies just creates a larger, weak colony. Again, the underlying reason for this colony's weakness was not solved by giving it more bees or honey/pollen. It is weak because it did not perform well. Giving it more resources does not change it's poor performance. I lose more colonies by combining than I do by disassembling them and redistributing them.
Which brings up another point; adding a frame of bees to a colony with out giving them additional stores to support those new bees just adds stress to the receiver colony. Its like adding a regiment of soldiers to an army but not giving that army the food, shelter, and arms to supply the new regiment. If you add bees to a colony, give them some supplemental feed or frames of honey to help them support the added bees.
In this area of Missouri, I feel a colony needs a minimum of 7 deep frames of honey and 2-3 frames of pollen to survive the winter, preferably 8-10. Or, as I've learned to say when doing hive inspections for other beekeepers, I want to see the equivalent of 7 deep frames of honey. This could be scattered over 10 partial frames of honey, or 20 medium frames. It does not have to be all in one place! The honey should be above and on the edges of the brood nest (or at this time of year, the former brood nest as they have seriously contracted the brood nest this year). The pollen is normally below and to the sides of the brood nest.
![]() Lastly, in mid-to-late December, I will lift the lid briefly and slide in a sugar cake for supplemental feed. It probably isn't necessary, but a 20 cent sugar cake is awful cheap insurance to make sure a colony can reach food during the cold periods when they are clustered tightly. The sugar cake sits directly on top of the frames (not above the inner cover). This placement serves two purposes; the cluster of bees will move up and end up in direct contact with the sugar. Secondly, the sugar cake will absorb moisture that otherwise would condensate on the lid/inner cover and drip back on the bees.
Lastly, in mid-to-late December, I will lift the lid briefly and slide in a sugar cake for supplemental feed. It probably isn't necessary, but a 20 cent sugar cake is awful cheap insurance to make sure a colony can reach food during the cold periods when they are clustered tightly. The sugar cake sits directly on top of the frames (not above the inner cover). This placement serves two purposes; the cluster of bees will move up and end up in direct contact with the sugar. Secondly, the sugar cake will absorb moisture that otherwise would condensate on the lid/inner cover and drip back on the bees.
I do not use loose sugar because I find it awkward to remove it when necessary. And, there is growing evidence that bees remove loose sugar and pollen patties as trash instead of eating it. We merrily assume they ate it, when in fact, they have tossed it out the front door! They have to lick a sugar cake, so I know they are consuming it, not throwing it away.
I rarely use pollen substitute patties at all for the above reason. However, I never use them in the fall. The bees are bringing in tons of pollen and do not need, or want, a soy based substitute (we call them pollen patties, but they're not). Secondly, these substitutes act like Small Hive Beetle (SHB) lures. The SHB LOVE them! I tried them in my early years and had too many problems. There have been too many examples of these problems on the Facebook groups and bee forums recently to doubt why pollen subs in the fall are a bad idea.
A beekeeper I visited recently is using a “quilting” method to absorb moisture in the winter. She adds wadded newspaper in an empty super. This works, I've tried it. However, as my number of hives has grown, I find the winter rims with ventilation holes and sugar cakes work best for me with the least amount of effort. The holes allow moisture laden air to vent out of the hive and the sugar cakes soak up anything else. So far, I have winter losses below the average, so I like what I'm doing.
Some worry that the ventilation holes allow too much heat loss. First of all, remember that bees handle cold much better than they do wet conditions. Cold does not kill the bees, but moisture will. Secondly, I've seen too many dead colonies of bees from having the hives sealed too tight. Opening up a hive of dead, slimy, decaying, fungus covered bees in the spring because they were sealed too tight is not something I want to repeat.
One last thing - I've been asked about wrapping the hives. We live in southern Missouri! It rarely gets cold enough here, or gets cold enough for long enough, to bother the bees. So wrapping this far south is too much of a good thing. Wrapping this far south, causes them to stay too warm, eat too much, and they don't get the cold stratification period they seem to need to thrive. These bees evolved in Europe and Asia where it gets cold. A cold period is part of their natural cycle. When we alter that cycle too much we end up loving them to death! Take care of your bees but don't coddle them – it only hurts them in the long run. As always, managing bees is about achieving a balance – too much of a good thing is out of balance and becomes a bad thing.
To summarize, this is the winter preparation that works for me:
- Cull and redistribute frames from weak hives. Add them to the moderate hives that only need a frame or two to get to “strong” status
- Add a winter rim with ventilation holes in September
- Make sure mouse guards are on all the hives throughout the year but especially in the Fall
- Close off the screened bottom
- Add a sugar cake in December or so
- I may reduce the entrance or not. Sometimes I do, sometimes I don't....
Boy! This turned out to be longer than I anticipated. I hope these methodologies and explanations help you refine your winter preparations. Please email or call me with questions or if a particular point needs better explanations. Now its time for one of my favorite seasons! I love winter!
More articles important to this topic:
Taking Winter Losses In The Fall
#savethebees #bees #afuturewithbees
Click to see the video: